Before you start
Creating an AKS-cluster is easy and there are more than enough manuals who will guide you through the process. We at Intercept especially like the official Microsoft manuals at https://docs.microsoft.com/en-us/azure/aks/ because they are complete and always up-to-date. However, there are several important choices to make before you can start to create your cluster.
1. VM type
Choose the correct VM-size for your Kubernetes cluster. Kubernetes self consists of many pods and they use memory and CPU too. This overhead is quite significant for small VMs, up to 65% overhead on the smallest 2Gb memory VMs. At 64Gb memory the overhead is reduced to just 10%. My advice therefor would be to skip the small VMs and choose a bigger VM-size if possible.
Luckily it is now possible to change VM-size of your AKS-cluster, this was not possible before. You can upgrade your AKS-cluster not only by number of VMs but also the size of the VMs. This way you can reduce the amount of overhead. An extra benefit of larger VMs is the increased IOPS and number of disks, small VMs have little and slow disk access.
For more information regarding VM-size and overhead please check the following link.
2. The network model
An AKS-cluster can use one of two network models, Basic and Advanced Networking. You can’t change the network model after you created an AKS-cluster. The Basic Network model is, like the name implies, basic in features. You can’t connect the AKS-cluster to a VPN connection or other virtual networks within Azure. This, and more, is possible using the Advanced Network model, however you should make sure you have enough IP addresses available. The Advanced Network model uses a lot more IP addresses than the Basic Network model. Check the following link for more information about the two network models: https://docs.microsoft.com/en-us/azure/aks/concepts-network
3. Network size and pods per node
Another setting you should provide when deploying an AKS-cluster: the number of pods per node. When using the Advanced Network model (which you probably should) Azure sets a default limit of 110 pods per node. Azure will reserve in advance one IP-address per pod per VM. This means that a default VM in AKS will use 110 IP-addresses. When updating an AKS-cluster Azure will one by one add a new VM and then remove an old VM.
A /24 network consists of 256 IP-addresses so there can only be two VMs, however you need room for one extra VM to update the cluster. So, a /24 network is limited to just one VM.
Always choose a bigger network for an AKS-cluster. A /23 has 500 IP-addresses so enough for 3 VMs, an /22 network has 1000 IP-addresses so enough for 8 VMs.
4. Kubernetes RBAC with Azure AD
Azure uses the RBAC model, every Azure AD user has one or more roles and receives the access rights granted by these roles. RBAC does not apply within an AKS-cluster, all users with access to the AKS-cluster share the same ‘admin’ role and receive full admin access. This is obviously not what you want for a production environment. Therefor, connect your AKS-cluster to Azure AD so the RBAC model also works within your AKS-cluster. Now you can create custom roles and assign these roles to your Azure AD users. The AKS roles can be granted to the complete AKS-cluster or to individual namespaces. Again, this is a feature you must activate when creating an AKS-cluster, you cannot add this feature to an existing AKS-cluster. For more information see link.
The four choices discussed above are important when you deploy a production AKS-cluster. They are quickly overlooked when deploying an AKS-cluster and cannot be added after deployment. But just like the rest of Azure, features for AKS are released almost daily. Keep yourself up-to-date with the latest best-practices and available features before you create an AKS-cluster. This especially important because many features cannot be added to an existing AKS-cluster, only at deployment time. The list of all AKS best-practices can be found here.
Monitoring, know what’s happening
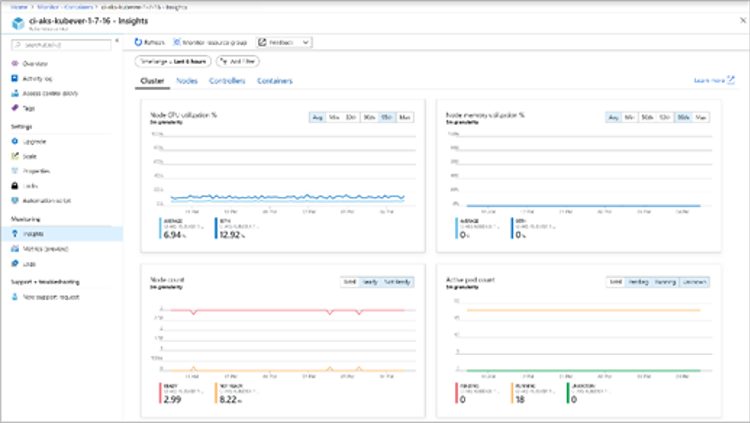
Juist like with any other service monitoring is important. By connecting your AKS-cluster to Log Analytics all logs and metrics are visually available in the Azure portal. Also, with Log Analytics you can create alerts to signal when certain events happen of limits are reached. Log Analytics is free, you are only paying for storage. For more information regarding Log Analytics and AKS see: link.
Monitoring dashboards, everybody likes them:

Not IaaS, not PaaS but KaaS
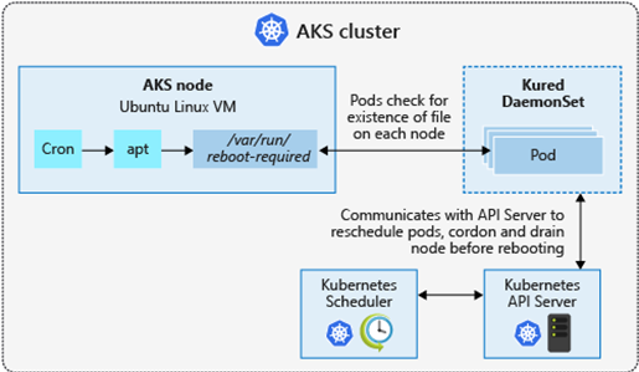
An AKS-cluster consists of an IaaS and PaaS part, I call it KaaS (chees 🧀 in Dutch). Microsoft is responsible for the Kubernetes cluster (the PaaS part) and you are responsible for the underlying VM’s (the IaaS part). Microsoft will install updates on the VM’s but rebooting and activating these updates is your responsibility. Luckily there is an easy solution available, Kured. By deploying Kured in your AKS-cluster Kured will reschedule and reboot your nodes when necessary. Kured will reboot your nodes one by one, so if your cluster consists of 3 or more nodes your application will not experience any downtime. Kured is easy to deploy, read more about Kured at the following link: https://docs.microsoft.com/en-us/azure/aks/node-updates-kured
Kured in a nutshell:

Best-practice, resource limits and resource requests
When you deploy an AKS-cluster for production workloads it is even more important that workloads won’t affect each other. How do you prevent that one application uses all resources and prevents other applications from functioning? By using quota’s and resource limits.
An administrator can apply quota’s on cpu, memory and number of pods to namespaces. A developer can limit cpu and memory to individual pods. Therefore, if these quota’s and limits are correctly set it is impossible for an individual application to overload the cluster.
With Resource Requests a developer can specify the minimal resources (cpu and memory) necessary for the execution of a pod. Kubernetes will make sure these resources are always available to the pods. This helps Kubernetes to assign the pods to the right nodes and spread the load more evenly. There will never be a node who has no pods assigned while there are other nodes who are fully loaded.
Look here for the Microsoft documentation about quota’s, resource requests and limits:
Also, don’t forget to add the health probes. These health probes are crucial for Kubernetes to determine if a Pod is ready and still healthy. Health probes help Kubernetes to restart crashed pods or wait before sending traffic to newly created pods.
And now…
If you have followed the above tips you will have a proper AKS-cluster for production workloads. But, pay attention to what Microsoft is doing with AKS and Azure. AKS is continuously in development and new features are added almost daily. Super cool new features are coming soon like node auto-scaling, node-pools, keyvault integration and much more. Microsoft is fully dedicated to Kubernetes!