Are your Azure security controls strong enough to withstand a cyberattack?
Cloud security is hugely complex. Every layer can be a possible entry point for malicious attackers. And they are becoming more sophisticated with their tactics while using the latest technologies (such as AI) every day.
Think about it: just one compromised credential or an outdated application can lead to a data breach. We’ve got to make sure not to leave any spots open, minimise the attack surface, and secure every layer of the underlying cloud infrastructure.
Fortunately, we’ve gathered these undisputable Azure security best practices to help you secure your Azure environment. So, let’s get in!
Author
Niels KroezeCloud Content Specialist
Reading time 16 minutesPublished: 14 February 2025
Security E-book
Learn how to secure your Azure environment with different technologies, tools and best practices we apply daily with our software-driven customers.
Before we dive into our Azure security best practices tips, we cannot emphasise enough that you first should remember your responsibilities in cloud security. Don't assume Microsoft will handle it all for you. For example:
If you're using Infrastructure-as-a-Service (IaaS), you're responsible for security configurations, software, operating systems, and data.
If you're using Platform-as-a-Service (PaaS), you remain accountable for application security and the protection of data, whereas Azure handles the middle ware layers and runtime.
If you're using Software-as-a-Service (SaaS), Microsoft handles more security, but you still have responsibilities.
This means you must always know which components you are responsible for versus what Azure handles.
That said, here are the most relevant best practices for securing your workloads in Microsoft Azure.
Azure Security Best Practices Checklist
What's included in this 3-page checklist? Best practices for securing your workloads in Azure, including expert tips for IAM, data security to network security and more!
We start by introducing you to one of the most important tools on the best practice list: Microsoft Defender for Cloud (previously Azure Security Center).
Microsoft Defender for Cloud is a cloud-native application platform (CNAPP) with a set of security measures and practices to protect your cloud-based applications from cyberthreats and vulnerabilities.
This Azure service serves as a security centre that monitors your overall security posture. It shows your security state, what to improve, and how to do that. You can use Microsoft Defender for Cloud to periodically check your resources' security and be alerted when something needs your attention.
Source: Microsoft
Features:
Threat detection: Uses machine learning (ML) and other technologies to detect and prevent cyber threats (phishing, malware, etc).
Vulnerability management: If Microsoft Defender for Cloud detects unusual activity or attacks, attack analysis helps you investigate incidents.
Security alerts log suspicious events: You can set up email notifications to alert security teams or the service desk based on severity (high, medium, or low).
In addition, there’s something called security score. As its name reveals, it reflects the score of your environment’s security posture. Microsoft provides best practice recommendations to improve it. For example, missing system patches might cost you security points.
What’s more, Defender for Cloud extends its protection to other cloud platforms such as AWS, giving you a unified security posture across multiple clouds. You can monitor threats, enforce compliance, and detect vulnerabilities – and that all from a single pane of glass.
If that weren’t enough, it also integrates with hybrid environments. So you can secure your servers, VMs, and workloads while transitioning to Azure.
2. Adopt Zero Trust
Approaching cloud security with the classic approach “trust but verify” is not from this time any more, as cyber attackers are more ruthless than ever using all the latest technologies such as AI. That’s why as organisation you must adopt Zero Trust, which is based on the principle of “never trust, always verify”.
It involves trusting no one by default; persons, machines, apps – when we say no one we mean nothing. As security threats can emerge from outside as well as inside, every access request requires verification.
Verify explicitly: Authenticate and authorise every access request with all data available to you (user, location, device health, service or workload, data classification, anomalies). Only good requests get access to the resources.
Least privilege: Only grant access on the principle of “least privilege”. Users and devices should only have what they need to do their job. This reduces the attack surface and the ability to move laterally in the network.
Assume breach: Zero Trust assumes breaches are going to happen. So we focus on minimising the impact of the breach by segmenting the network and applying strong security controls to limit the attackers ability to move laterally. Continuous monitoring and analysis is key to detect and respond quickly to security threats.
3. Enable Multi-Factor Authentication if you still haven’t
Relying solely on a username and password is outdated. Nowadays, cloud services face over 300 million fraudulent sign-in attempts alone on a daily basis. No wonder, most organisations use Multi-Factor Authentication (MFA). Adding more verification steps beyond just a password greatly diminishes the risk of unauthorised access, even if passwords are compromised. Did you know that MFA can prevent 99.9% of attacks on your accounts?
It enhances security by incorporating multiple layers of verification:
Password: Something only the user knows.
Mobile phone for OTP: Something only the user has.
Fingerprints: Something unique to the user.
But how you enable Multi-Factor Authentication (MFA) matters. We can allow it in different ways, so let’s zoom in on them:
3.1 Use security defaults
Microsoft Security Defaults are a set of basic security settings recommended by Microsoft for your Entra ID tenant. They are designed to provide a baseline level of security for organisations that might not have more advanced security measures in place.
The simplest way to enforce basic security:
Requires all users to register for MFA within 14 days.
Admins must always use MFA.
Blocks legacy authentication (e.g., basic auth for Exchange Online).
You can either enable Security Defaults or Conditional access policies, but not both simultaneously.
3.2 Conditional Access-Based MFA (P1 Feature)
Conditional access is a set of policies based on "if-then" logic. You can create rules that act on specific conditions. For instance you might set a policy like this:
If the user is signing in from an unfamiliar location → Require MFA.
If the user is in the office on a trusted network → No MFA needed.
Conditions can include device type, application, user risk level, and more. This is the best approach to apply MFA in your tenant since it provides granular control. Thus, MFA is applied precisely when needed.
3.3 Risk-Based Conditional Access (P2 Feature)
This option offers more advanced control but comes with a higher cost. Microsoft determines what constitutes a risky user. Think of suspicious activities like:
Atypical travel: A user logs in from the Netherlands at 12:00 and Australia at 12:30.
Suspicious browsers or IP addresses: Logins from flagged locations or devices.
Password spray attacks: Repeated login attempts with common passwords.
If a user is flagged as risky, they must verify their identity via MFA before gaining access.
Conditional Access is without doubt a security must-have. But be sure not to mix the methods.
4. Implement Role-Based Access Control (RBAC)
When deploying resources in Azure, you should secure them. Role-Based Access Control (RBAC) is a great way to start. It is a system that provides access management to resources. RBAC allows you to provide granular permissions or privileges to administrators to perform specific tasks on specific objects. Thus, you can control which people have access to which resources by implementing these access controls. You can apply it to all your Azure resources, including resource groups and subscriptions.
In the image above you can see an Entra ID instance with users assigned to roles across different parts of the Azure portal.
RBAC works at multiple levels:
Management groups: If you use these to group your subscriptions, a role assigned at this level applies to all subscriptions in the group.
Subscription level: Applies to all Azure resources in the subscription.
Resource group level: Limit access to specific resources in Microsoft Azure.
Single resource level: A user can be restricted to just one VM, storage account or any other individual resource.
Effectively applying RBAC can be challenging but necessary. The issue is that assigning a role or permissions often grants more access than needed. So, how do you manage it properly?
It’s not best practice to have too many Global Admins in your environment or give everyone owner rights to all the subscriptions.
Instead, use a fine-grained access method to gain access to your resources and employ the concept of least privileged access – as users end up only having the access to what they need. This removes the likelihood of unnecessary privileges being assigned to administrators.
When done effectively and appropriately, minimising administrators' number of permissions and access, you minimise the attack surface.
To make your users more secure within your tenants, you need to layer security. You start with a password, then add MFA, conditional access, and finally PIM. Each layer builds on top of the other as if you were constructing your fortress, but this time a digital one.
Azure’s Privileged Identity Management (PIM) is a feature available within Entra ID that grants temporary access to an admin to perform high-level admin tasks.
PIM mitigates the risks of excessive, unnecessary or misused access permissions on resources. It does this by providing time-based and approval-based role activation.
For example: you can use PIM to grant just in time privileged access to Azure resources. If users need to maintain a virtual machine, you can grant them access on Monday morning as a Virtual Machine Contributor. Outside that time, they are just a regular user.
Key features include:
Just-in-time privileged access
Assign time-bound access with start and end dates
Requires approval to activate privileged roles (which ensures their manager is aware of what the user is doing in the tenant).
Enforces multifactor authentication to activate any role (so the right person is accessing the role).
Users must provide a reason for their activity
All global admins in the tenant will be notified of the activation and the reason provided.
It’s an Premium P2 feature, and you can buy licences only for the admins who need it, which makes it also a cost-effective solution.
Now let's look at data security in Microsoft Azure.
6. Encrypt data at rest and in transit.
Encrypting our data in transit and at rest are very important tasks to perform if you're going to be storing and retrieving data from and sending data to Azure storage. In basic terms, it means encoding your data using a secret key or code. So, when things go sideways, and sensitive data falls into the wrong hands, it remains unreadable.
Data Encryption at-rest
All Azure storage and storage accounts or virtual machines and virtual disks own encryption at rest. Let’s assume an attacker managed to get those VMs, virtual disks or storage accounts out of Azure. Then, they try to mount them on a local machine, and they would be prompted with a BitLocker encryption key when encrypted in rest.
When you deploy your device or service, it'll use Platform Manage Keys, or PMKs, which means that Microsoft looks after the encryption keys for you. But you can also bring your own – Customer Managed keys (CMKs).
Sometimes, for compliance reasons, you might need to look after CMKs. However, we suggest you use PMKs and let Microsoft manage that for you (unless there's a specific niche use case scenario that needs them).
Azure SQL database and servers
Transparent data encryption is great for securing the data inside the database. Within, data is protected by the Transparent Data Encryption feature or TDE, which is enabled by default.
Azure Policy provides a few ways to manage TDE such as setting up an audit-only policy, which flags databases or SQL servers without TDE enabled in the Azure Policy portal. This helps identify non-compliant resources but doesn’t enforce any changes.
To encrypt confidential files stored in your cloud storage or server, use AES-256 to provide a layer on top for protecting sensitive data.
Data in transit
You should also make sure that data in transit is secured. You secure this with TLS, short for Transport Layer Security. For most services, secure data transport is enabled by default, or you can enable it yourself.
Utilise TLS 1.3 to secure data in transit going around the internet.
The best practices to remember are:
Always encrypt data at rest.
Always encrypt data in transit.
Is your Azure tenant secure?
Avoid costly downtime and data loss. Get a comprehensive review of your Azure environment to identify vulnerabilities, misconfigurations, and compliance gaps.
7. Use a separate Azure subscription for production
Best practice for production is to have a separate Azure subscription. This keeps your production data and other assets out of your development and test environments. You can also apply different policies across resources in multiple subscriptions.
8. Protect your application secrets with Azure Key Vault
You shouldn’t store secrets like API keys and connection strings in your application code where every developer can see them.
You should store them in a central location. In Azure, that’s Azure Key Vault which is a key management solution where you store your secrets, keys and certificates for your applications. You can securely connect to Azure Key Vault from your services using Azure Managed Service Identity. Thus, you don’t have to use an API key or connection string.
And to sweeten the deal, it integrates seamlessly with other Azure services, so you can manage keys and secrets easily within your Azure environment.
9. Keep an eye on network traffic
Network access is an essential security control for Azure network security. Again, within Azure’s array of network security best practices, having various security layers is indispensable to protect your resources.
Layer 1: Use Azure Firewall
Start building a multi-layered network with a firewall, like Azure Firewall. This layer of defence includes security measures such as Firewall Policies, DDoS protection, IDS/IPS, web content filtering, and vulnerability management.
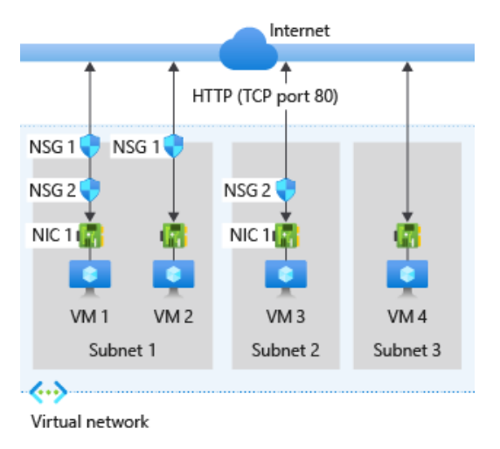
Layer 2: Apply Network security groups (NSGs) at the right level
By default, a virtual machine (VM) can be deployed with just its built-in firewall, but that’s not enough. If an attacker bypasses it, they’re inside. Therefore, layer your security defences by using Network security groups (NSGs). NSGs add an extra layer of security, filtering traffic before it reaches your VM. So, you can block unwanted traffic from entering or leaving an Azure subnet.
You can apply NSGs at two levels:
Subnet: The preferred approach. One NSG controls traffic for all VMs in a subnet, making management easier.
Network interface: Useful for specific cases, but managing individual NSGs for every VM doesn’t scale well.
For a front-end web farm or any grouped workloads, assign NSGs at the subnet level. This keeps security policies consistent and reduces administrative overhead.
Layer 3: ExpressRoute and site-to-site connections
In addition, opt for ExpressRoute and site-to-site connections. Avoid using the internet when a dedicated WAN connection is available.
10. Restrict access to your Virtual Machines (VMs)
If you use a virtual machine (VM) in Azure, you maybe use RDP or SSH to connect to it. Opening the RDP or SSH port creates a security vulnerability. You should leave these ports closed when you create a VM. Instead, you can deploy your VM in a virtual network and use Azure Bastion to connect to it securely. With Azure Bastion, your VM can operate without a public IP address, providing an added layer of protection from external exposure.
The best practices to remember are:
Keep the RDP and SSH ports of your VMs disabled
Use Azure Bastion to connect to your VMs
11. Restrict access to your database
You want to restrict database access to only the people and services you authorise. In all Azure databases, you can configure the firewall, which is enabled by default and blocks IP addresses that are not allowed.
For production, you can wrap your database in a virtual network and use Azure Private Link to connect to it from the services that you need. This shields your database from the outside world.
The best practices to remember are:
Enable database firewalls and maintain them strictly.
In production, shield databases from the outside world using Azure Private Link.
12. Implement a Web Application Firewall
Your web applications are under constant attack. They get hit by things like SQL injection attacks and cross-site scripting attacks. To deal with these attacks, you should implement a gateway service like Azure Front Door or Application Gateway that can route and filter your traffic.
In these services, you should enable the Web Application Firewall feature. This detects attacks and can block and report them.
The best practices to remember are:
Implement a gateway service like Azure Application Gateway or Azure Front Door in front of your web applications.
Enable the Web Application Firewall feature to protect against attacks.
It enables you to control inbound and outbound traffic and connect to various resources from the backend.
13. Always update software
Outdated software is a major security risk. Microsoft’s strongly recommends updating systems for VMs in Azure. Also, consider:
Enabling Microsoft Defender for Cloud: Leverage Microsoft Defender for Cloud (previously Azure Security Center) to not miss out on essential security updates and for automating patching.
Use Azure Update Management: Automate updates for both Windows and Linux VMs to avoid gaps in security.
Applying updates quickly and automate: Delayed patching increases risk. Critical updates should be applied as soon as they’re available. Besides, use Azure Automation to set up policies for updating your VMs.
Configuring scheduled updates: Where possible, set up scheduled updates to automatically update all software so you maintain the most recent versions.
Keeping your VMs up to date ensures better security, fewer bugs, and a more stable cloud environment.
14. Leverage Azure Policy for compliance
You need control over when resources are deployed and when they’re removed. Azure Policy makes it easy to enforce rules automatically as it works by allowing or denying actions. You can use built-in policies or create custom ones to enforce security and compliance.
Use policies to control deployments
Restrict locations: Prevent resources from being deployed in specific regions (e.g., block VMs in Germany).
Block risky configurations: Stop VMs from exposing ports like 43389 to the internet.
Auto-correct settings: If an open port is detected, the policy can automatically close it.
Policy enforcement modes
Audit: Tracks non-compliant resources without blocking changes. Useful for testing before full enforcement.
Deny: Blocks non-compliant deployments (e.g., prevents open ports or unencrypted databases).
Append: Adds required settings to resources (e.g., enforces tagging or monitoring rules).
Deploy If Not Exists: Ensures required configurations are applied (e.g., enabling encryption on SQL databases).
That said, it goes beyond deployments – you can apply it to existing resources to audit compliance and enforce security best practices. If you haven’t implemented it yet, it’s never too late to start.
Closing thoughts
Something in Azure that is true yesterday may not be true today. In other words, Microsoft’s cloud platform is constantly evolving, changing and adapting to market needs. Therefore, always test and assess the implemented functionalities to ensure everything works securely.
Always assume a certain level of change so that you can always be on your guard and ensure that you are ready if a change affects how you deploy your Azure infrastructure. As such, stay informed and ready to adapt your security strategies.