Blog Azure Cloud Costs

Azure Spot VMs: A Practical Guide with Use Cases and Best Practices

Costs are among the biggest considerations when choosing and deploying virtual machines (VMs) as instances or as virtual machine scale sets (VMSSs) in Microsoft Azure

There are various ways to optimise costs in Azure, such as Azure Hybrid Benefit, Reserved Instance, Azure Savings Plans, running from alternative regions and Azure Spot Virtual Machines (previously known as Azure Spot Instances). 

However, what are they, and how do they work exactly?

This is the perfect guide to Azure Spot VMs, where we’ll cover it all. Let's dive in!

Niels Kroeze

Author

Niels Kroeze IT Business Copywriter

Reading time 20 minutes Published: 21 February 2025

What is Azure Spot Virtual Machines (VMs)?

Azure Spot Virtual Machines, formally known as Azure Spot Instances, is Microsoft’s offering to leverage unused Azure compute capacity at heavily discounted prices – up to 90% compared to pay-as-you-go (PAYG) prices. 

An Azure Spot Virtual Machine is a cloud server instance offered at a significant discount compared to a standard instance without an offset. As the name “spot” suggests, when compute capacity frees up in Azure, Microsoft will provision your VM or VMSS workload in this compute capacity in one of Azure’s regions.

However, there’s a trade-off: Microsoft can shut down spot VMs anytime with little to no warning, making it quite unpredictable and not suitable for traditional workloads. 


Why Does Microsoft Offer Azure Spot VMs?

Cloud providers, such as Microsoft, offer these spot instances because their platforms have unused compute capacity during periods of low demand. Instead of ending up leaving servers idle, they recoup some of the cost by offering these, potentially lucrative, discounted instances. When demand for compute goes up, they reallocate spot virtual machines to higher-priority workloads and evict them as needed. This way, Microsoft Azure can use resources more cost efficiently while giving customers access to cheaper compute services.


How do Azure Spot VMs work?

When customers are running VMs, they use up parts of capacity. At the same time, Microsoft must maintain spare capacity to meet growing demand, new business, and those auto-scaling features of the cloud. 

This means Microsoft reserve capacity for customers running non-spot Virtual Machines, especially those paying for on-demand capacity reservations. Any capacity available after this is what spot virtual machines are run in, which you can consume at a discount.  
 
The amount of discount you get depends on the capacity left in the data centre:

  • High unused capacity = Bigger discounts, lower price, less likely to be evicted
  • Low unused capacity = Smaller discounts, higher price, more likely to be evicted

However, when reserved capacity grows it will eat into this spare capacity, and based on how much you have indicated you are willing to pay, evictions will start taking place – deallocating the cheapest workloads across all customers offline first and moving up until PAYG price is met.

When there is no spare capacity, such as when PAYG VMs are consuming all available resource, the Azure Spot Virtual Machines are either deallocated (shutdown) or deleted – based on how you configured the Spot Virtual Machine eviction policy. 

Rekenmachine

Azure Cost Scan

Get a free cost scan from our experts based on your current Azure cloud usage!

Read more!

Eviction Types and Policies

Eviction Types

When Azure evicts a Spot Virtual Machine, the VM becomes unavailable, and any workloads running on it are disrupted. Azure will do this for two reasons: 

  1. When Azure needs additional capacity, it must reallocate resources for higher-priority workloads (e.g. PAYG resources, capacity reservations).
  2. When the current spot VM price is higher than the price threshold you set.

Yet, Microsoft is flexible; you can decide on the eviction types and policies. 

Concerning eviction type, you’ve got two options:

  1. Capacity only: Selecting this option means Microsoft will evict your virtual machines when Azure starts to grow into this previously unreserved capacity.
  2. Price or capacity: Microsoft lets you set a maximum price you're willing to pay, so you can retain the VMs for weeks, even if there is a slight increase in the spot prices. They’ll only reclaim the capacity when Azure runs out of unused capacity, pushing costs up, which in turn exceeds your set maximum price.

Eviction Policy

When you deploy an Azure Spot Instance, you must also define an eviction policy. You may choose how to trigger your evictions or how to determine when the eviction should happen. There are two options:

  1. Stop / Deallocate: When using a single VM or VM scale set, you can set your eviction policies to deallocate. If the VM is deallocated your disk and your network continue to persist. The data stored on the persistent disk(s) is not deleted. All temporary disk data gets deleted like any VM restart or shutdown.
  2. Delete: You also have the option to delete the VM. In this case, the VM will be deleted, and all the associated resources are also deleted. This includes all data stored on any attached disks.

When to use which eviction policy

The table below illustrates when to choose which eviction policy, comparing when to delete vs when to deallocate /stop.

Policy types When to use the policy?
Delete For ephemeral compute and data.
When you don't want to pay for disks.
For minimal budget scenarios.
Deallocate / Stop Use when a specific VM size is required.
When location flexibility isn't an option.
For long application installation processes.
For situations with indefinite wait times.
Not purely driven by cost savings.


What should you consider when using Spot Virtual Machines?

You can start utilising Azure spot compute instances without re-architecting. Although it can be a flexible, scalable and cost-effective purchasing option for Virtual Machines, you must know that it has its drawbacks:

  • Microsoft can take capacity back from their on-demand customers at any time.
  • You’ll receive a 30-second warning before Microsoft takes back the server from you. This is subject to best efforts, and you must opt-in to receive these notifications.
  • Terminations are based on the availability of capacity and the maximum configured price.
  • Microsoft Azure doesn’t provide SLAs for these VMs.
  • Not all VM sizes are supported (such as B-series, promotional SKUs like as Dv2, NV, etc.)
  • You can't use Reserved Instances with Azure spot virtual machines
  • Ephemeral OS disks are not supported.
  • Capacity availability depends on region, size and time.
  • Deallocated VMs can be attempted to be brought back online but will only be successful if there is sufficient unutilised capacity.

Now, you may think that interruptions will to take your servers away all the time and not allow you to complete your work. Yet, Microsoft says that less than 10% of the time, Azure interrupts and reclaims capacity. 

While you must always be prepared to handle interruptions, you are more likely to turn off the virtual machines yourself.


Use Cases for Azure Spot VMs

Spot virtual machines excel in various use cases where interruptible workloads do not need to be completed within a specific timeframe, such as:

High-performance computing scenarios

In high-performance computing (grid computing or high-throughput workloads) Spot VMs are widely used. These workloads are often loosely coupled, meaning a single node failure won’t take down the entire cluster. Like big data, the work can be reprocessed if an instance is interrupted. The time lost is often insignificant compared to the cost savings you get.

Batch processing jobs and visual rendering applications

They are great for batch jobs, which are automatic tasks, often processed in large groups – “batches”. These tasks have flexible timing, so pausing or starting them won’t affect the workload.

Dev/Test environment

Useful for temporary environments where you don’t need uptime. Suppose you want to do load testing for a new web app to see how it performs under high traffic. You then need to spin up multiple virtual machines to simultaneously simulate thousands of users hitting the site.

With Spot VMs, you can:

  • Spin up many test instances for a fraction of the cost.
  • Live with interruptions since the test can be restarted if needed.
  • Scale up instances dynamically without worrying about high costs.

Since load testing is temporary and doesn’t require uptime, spot instances let you test efficiently without overspending on cloud resources.

CI/CD Pipelines

Spot VMs are great for continuous integration and deployment (CI/CD). Since testing and build processes can handle failures, Spot instances introduce another type of failure to manage. If your pipelines can handle interruptions, Spot VMs can save you a lot of infrastructure costs.

AI and Machine Learning

You can train models using Spot Virtual Machines and achieve significant cost-savings on compute costs. Let’s say you want to test a machine learning (ML) model (AI). Then you need to test various hyperparameters to find the best configuration. This means running multiple training jobs, but each job is independent and doesn’t need to run continuously or in parallel.

By using Spot VMs, you can:

  • Run multiple training experiments at a much lower cost.
  • Tolerate interruptions since failed jobs can simply be retried.
  • Save up to 90% compared to using standard VMs.

If an instance is interrupted, the system can resume from the last checkpoint, minimising lost work while maximising cost savings.

Large-scale stateless apps

You might think these VMs aren’t suitable for web services because websites need to be up 24/7. But if you design a stateless and scalable web architecture, Spot VMs can work. Even if an instance is taken away, existing requests will be completed, and future requests can be routed to other available instances. So, Spot VMs are suitable for large-scale load-balanced web apps.

Fault-tolerant applications

Apps with built-in redundancy and failover can use Azure Spot VMs. These workloads can handle interruptions by automatically shifting to other available instances.

Examples include:

  • Distributed databases
  • Microservices architectures with auto-recovery
  • Large-scale caching systems

You can mix Spot and traditional Virtual Machines to have a dedicated “core” number of nodes and scale in these core VMs when Spot Virtual Machines are available, switching them to make the most of cost efficiencies and your scalability needs.

Chris Tout

The benefits of Azure Spot Virtual Machines

  • Significant cost-savings: You can save up to 90% compared to standard machines. For example, if a standard VM costs $100, a Spot VM of the same type may cost just $15–$20 per hour or month, depending on usage.
  • Flexible scaling: Combine spot VMs with standard VMs using Virtual Machine Scale Sets to balance cost and reliability. Just as with pay-as-you-go VMs, you can stop Spot VMs whenever you don’t need them anymore.
  • Maximising compute: Spot VMs are cost-effective, but it’s not just about saving money. Instead of spending $100 on standard VMs, you can use spot VMs to get 10x more compute for the same cost. So, you can do more with the same budget or do the same with significantly less.
  • Capped prices: You can pay the price you agreed in advance by setting your maximum price. That is to say, you’re capped when a price change occurs.


How does pricing work in Azure Spot Virtual Machines?

Spot Virtual Machines allow you to significantly reduce the operational costs of stateless workloads, resulting in considerable discounts – you may achieve up to 90% savings compared to pay-as-you-go pricing.

Nonetheless, the reality often shows that spot VMs save you 70- 90% consistently on spot virtual machines over the price of pay-as-you-go. However, savings can be as low as 30 or 40% during high unused capacity demand. In that case, you’re probably better off using Reserved Instances. 

Take into mind:

Spot pricing can change over time as well. So, the discount you get when deploying an instance can get lower over the life span of the VM instance. 

The actual price of your spot VM will vary based on the amount of unused capacity in Azure across different VM sizes and in various Azure regions. You won’t notice dramatic fluctuations because the long-term supply and demand function do not change dramatically. 

That said, these factors impact the ultimate price for each Spot VM:

  • Instance type (VM series)
  • Operating System (OS)
  • Region

Moreover, Microsoft provides historical pricing information on eviction rates (past 28 days) and eviction rates per size in a region in the portal while you create the VM. There, you can see estimates of the probability that your workloads will be evicted.


Get pricing history with Azure Resource Graph

You can access relevant Spot VM SKU data programmatically using Azure Resource Graph. This lets you retrieve pricing history from the past 90 days and eviction rates from the last 28 days, helping you identify SKUs that best fit your specific requirements.

KQL

SpotResources 
| where type =~ 'microsoft.compute/skuspotpricehistory/ostype/location' 
| where sku.name in~ ('standard_d2s_v4', 'standard_d4s_v4') 
| where properties.osType =~ 'linux' 
| where location in~ ('eastus', 'southcentralus') 
| project skuName = tostring(sku.name), osType = tostring(properties.osType), location, latestSpotPriceUSD = todouble(properties.spotPrices[0].priceUSD) 
| order by latestSpotPriceUSD asc

Figure 1: Spot pricing history sample query

KQL

SpotResources 
| where type =~ 'microsoft.compute/skuspotevictionrate/location' 
| where sku.name in~ ('standard_d2s_v4', 'standard_d4s_v4') 
| where location in~ ('eastus', 'southcentralus') 
| project skuName = tostring(sku.name), location, spotEvictionRate = tostring(properties.evictionRate) 
| order by skuName asc, location asc

Figure 2: Spot eviction rates sample query

You can also use the Azure Resource Graph (ARG) REST API to retrieve pricing history and eviction rate historical data.


How do you find the right Spot VM?

You can use the Spot VM Advisor page to find the right Spot VM for your workload. Here, you can filter and sort on specific requirements such as the OS, region, payment terms, and VM series you want, along with the number of virtual CPUs and RAM your VM requires along with your maximum price threshold. Selecting spot pricing will recommend the right VM type based on your inputs.

How to find the right Spot VMs in Azure

To get a complete view of all instance types and prices, you can check out the current pricing table here: https://azure.microsoft.com/en-gb/pricing/spot-advisor/#pricing

TIP:

Compare prices and eviction rates of neighbouring regions and choose to pay a little more for a lower eviction rate. You might pay less by deploying a spot VM in a different region.

Lastly, if you’re unsure what you want, you can use the Azure Pricing Calculator - that’s useful for assessing what you might gain versus what you might lose. This tool helps you calculate the estimated hourly or monthly costs for using Azure VMs.


How to Deploy Azure Spot Virtual Machines: A Practical Example

Once you’ve selected the Spot VM you want, deploying it is no different to a traditional VM. You can deploy spot virtual machines in multiple ways:

  • As a single VM (for standalone workloads).
  • As part of a Virtual Machine Scale Set (VMSS) (to handle scaling automatically).
  • In conjunction with Azure Kubernetes Service (AKS).

Azure also supports deploying Spot VMs using ARM templates, Bicep, Azure CLI, and PowerShell. However, the easiest deployment method is using the Azure Portal. From here, you can enable spot pricing when creating a virtual machine.

Please note:

Portal deployments are at higher risk of human error compared with Infrastructure as Code (IaC) deployments like ARM and Bicep.

Single Spot Virtual Machines

Step 1: Open the Azure Portal, go to all services and click on the virtual machines icon. 

Where to find the Virtual Machine in the Azure Portal

Step 2: Then, click on Create Virtual Machine, which is in the top left corner. You will be redirected to the Create Virtual Machine page.

Creating a Virtual Machine in the Azure Portal

Step 3: Like when you create normal Virtual Machines, choose a subscription, give your Virtual Machine a name, and fill in the other instance details such as region, availability options, zone options, security type, etc.

Creating a Virtual Machine in Azure

Step 4: Now, if you want to run a Spot VM in Azure, be sure to check the tick box “run with Azure Spot discount”. 

Selecting the tick box Spot VM in the Azure Portal when creating a VM

Step 5: When you’ve selected “Run with Azure Spot discount”, the eviction type and eviction policy show up.

Selecting the eviction policy and eviction type in the Azure Portal when creating a VM

Select the eviction type and eviction policy that fits your user's case. As you can see, you can pick either “capacity only”, which means your VM is evicted if Azure runs out of capacity and there are no “cheaper” Spot instances to deallocate/delete. Alternatively, you can opt for “price or capacity” as the eviction type, which adds additional reason to evict your VM, like when the cost exceeds your maximum configured price. 

For the eviction policy, you can opt for “Stop / Deallocate” to only delete temporary drive local data (if applicable) or the option “Delete”, which deletes not only the VM but everything along with it (resources – disks, nics, public IP addresses, and any local data).

Step 6 (optional): When you select “price or capacity”, specify the maximum price you want to pay so that if Spot VM prices increase, it doesn’t go beyond your price threshold.

Setting the maximum price in the Azure Portal when creating a virtual machine


Spot Virtual Machine Scale Sets (VMSS)

Spot Virtual Machine Scale Sets (VMSS) are groups of Spot VMs. That being said, deploying them is not so much different from creating a single Spot VM. 

Step 1: Again, open the Azure Portal, go to all services and this time, search for Virtual Machine Scale Sets and click on it to create one.

Step 2: Follow the same steps when creating a single Spot VM. ill in the required information, such as scale set details and your instance details. Then, just as before, don’t forget to check the box for “Run Azure Spot with discount”. Not to forget, think twice about the eviction type and eviction policy. 

Step 3: VMMS allow automated deployment and management of various Spot VMs, making scaling in and out way easier. For instance, you can define scaling rules by defining criteria for CPU usage or network traffic and set a preferred capacity within your price limit and availability needs.

CSP Enterprise Discount

Ready to scale up but afraid of the costs?

Visit our Azure Cost Management workshop! 

Yes, sign me up!

Best Practices for Azure Spot VMs
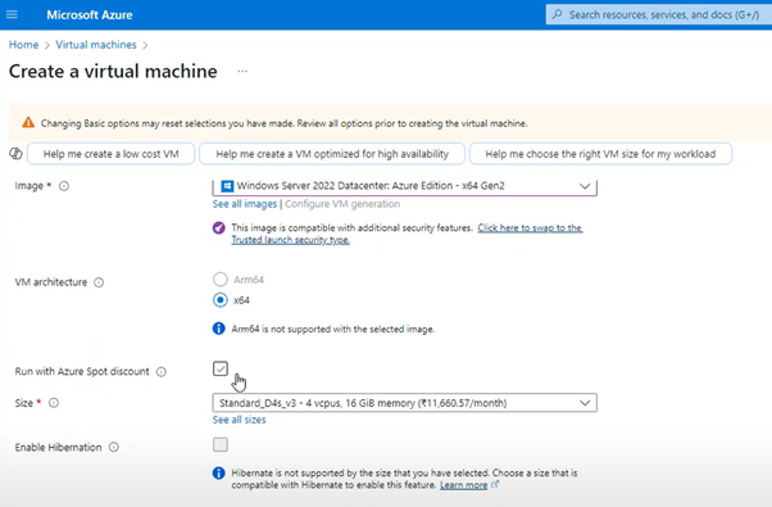
Set a price cap

Setting maximum prices prevents Azure from unexpectedly changing the Spot VM price and gives you better control over your budget. If the price exceeds your set maximum, your VM will be evicted, but you'll have better control over your costs.  However, availability will be reduced as you are more likely to be evicted with a price cap.

Review historical eviction rates

Review historical eviction rates to understand potential disruptions. While past eviction rates don’t guarantee future patterns, they can give insight into the frequency of interruptions. This will help you determine if your workloads suit Spot VMs or if you need alternative options.

Make your workloads resumable

Spot VMs can be evicted at any time so you must design your workloads to be interruptible.

Time your Spot VM usage well

There will be changes in spare capacity at different times of the day and week. For example, demand for Azure resources tends to drop during weekends or late-night hours. You can benefit by using spot instances out of business hours, because prices will be lower.

Be flexible 

Flexibility means building your orchestration to adapt. If you can, use a mix of VM types. Different VM families (D-series, F-series) might experience varying available capacity levels at any given time. This way, you can increase your chances of securing available capacity at a lower cost. 

But that’s not all; deploy in multiple cloud zones and regions, account for potential evictions, and prepare for various eviction scenarios to keep your workloads running smoothly and efficiently.

Enable Azure Backup

Protect your Spot VM data by enabling Azure Backup so you can recover data if VMs are interrupted. 

Optimise Scaling with Virtual Machine Scale Sets (VMSS)

Use VMSS to scale Spot VMs based on demand. This will help manage costs by adjusting the number of Spot VMs and VMSS can switch to standard VMs if needed to ensure workload stability.

Spot Priority Mix: combine standard VMs with Spot VMs

Spot Priority Mix is an Azure feature that lets you mix Spot and standard VMs in your workload. It will move workloads to Spot VMs when available and back to standard VMs when not.

Use Spot VMs for non-critical tasks and standard VMs for critical ones.

This way you reduce the risk of disruption and take advantage of lower prices for non-time sensitive workloads. This mix will make sure your workloads are resilient even if Spot VMs are evicted as standard VMs can continue to run without interruption.

Build a Flexible Orchestration Mechanism

Make sure your workload can handle interruptions by building an orchestration mechanism that can auto deploy new Spot VMs after eviction.

Continuously monitor

Monitoring is key with Spot VMs. Since Spot VMs don’t have an SLA and can be evicted at any time, the key is to anticipate when this will happen. With that information, you can plan a graceful shutdown and automate the replacement process to keep your workload running.


Closing thoughts

While there are multiple purchasing options in Microsoft Azure (pay-as-you-go, reserved instances), we recommend you leverage them wherever possible. But with Spot VMs, you know you are getting the best possible rates on compute. 

In addition, you have the flexibility to consume and use whatever you want, whenever you want, and give it back to Microsoft when you don't need it or want it anymore. Then, they will stop charging you, just like many subscription-based models.

Take into mind, though, that with Spot Instances, you are less in control. In other words, you need to be comfortable with the fact that Microsoft can decide at any moment to take it back from you.

FAQ Azure Spot VMs

How much can you save with Azure Spot Instances?

How do I know which Azure Spot VM I need?

When should you use Azure Spot Virtual Machines?

Who should use Spot VMs?

What is the difference between Spot and Reserved instances in Azure?

What is the difference between Spot and regular VM?

What are the disadvantages of Spot VMs?

What is the major downside risk to using Spot VMs compared to regularly provisioned VMs?

Working Jack

Get in Touch!

Are you looking for ways to save on your Azure costs? Contact us and we will happily help you out.