This only pauses the node pools. It doesn’t stop costs from other resources like:
- Load balancers
- Public IPs
- Ingress controllers
You migrate to Azure, everyone is excited, especially about Azure Kubernetes Service (AKS) – who isn’t?
But then: the first invoice arrives… giving some shocking surprises. Life is suddenly not so colourful anymore.
This raises the question: “Why is AKS costing us this much?”.
In this article, we’ll break down 15 AKS cost optimisation tips and techniques you can use to save money.

Reading time 13 minutes Published: 19 September 2025

Use the AKS whitepaper to spot wasted capacity, review scaling choices and reduce unnecessary costs without compromising performance.
Download the whitepaperAKS offers a free control plane and a great way to provision clusters quickly and easily. However, because provisioning is so easy and simple, costs can escalate quickly. Minor oversights often lead to thousands of dollars’ worth of consumption in Azure.
The following techniques and tips will lower your AKS bill:
Let's dive into each:
“Rightsizing” is one of the common AKS cost optimisation tips you find anywhere – but it’s not just about picking a D8 or D12. It’s about choosing the right VM family, size and version based on your workload requirements.
Azure offers several VM families, each designed for different types of workloads:
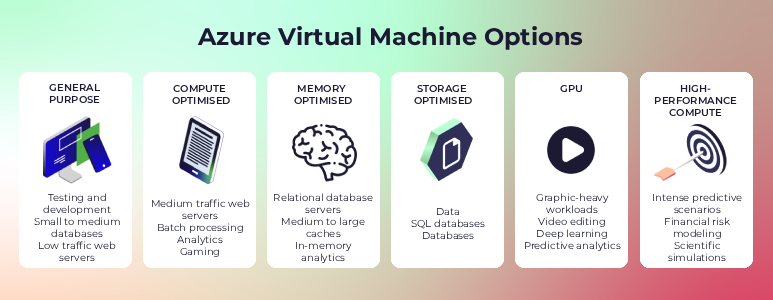
In addition, each family has different sizes available with different:
In addition, each VM size has its own cost and pricing. But how do you find the right family?
Start by figuring out your CPU-to-RAM ratio.
When you create an AKS cluster, the default is usually a D-series VM (e.g. D8 = 8 vCPUs + 32 GB RAM). However, not all workloads require the same CPU-to-RAM ratio. Hence, you need to know what you’re using it for to select the VMs and the node count appropriately.
Once you know your workload needs, you can pick the right family, for example:
But then you'll still need to choose a version, which can impact cost. Take the D-series: it has up to six versions (v1 to v6). Newer versions usually offer better performance, but not always at the lowest cost.
Pricing depends on:
Always compare versions and regional pricing before locking in your choice. Also, you can always scale up the nodes after you get things going, but every running node costs money. Therefore, make sure to choose what would fit your AKS cluster.
Get our Azure Cost Management Whitepaper! With the best tips, tricks, and background knowledge to optimise your cloud costs.
Download for free!Each node in your Azure Kubernetes Service (AKS) cluster is essentially a standalone virtual machine, so Microsoft bills you the whole time they’re up and running. When you create a cluster and just leave it running, it’ll stay active 24/7. In other words, costs stack up regardless of its use.
Ask yourself: “Do you really need these resources running 24/7 for the whole year?” Like what happens when developers aren’t using the cluster (overnight or during weekends)?”
Consider stopping and starting the cluster for Dev and Test environments that you only need during working hours. This is a quick way to reduce the cost of running the cluster. It shuts down the Kubernetes cluster when it is not needed (without deletion), check the visual below:
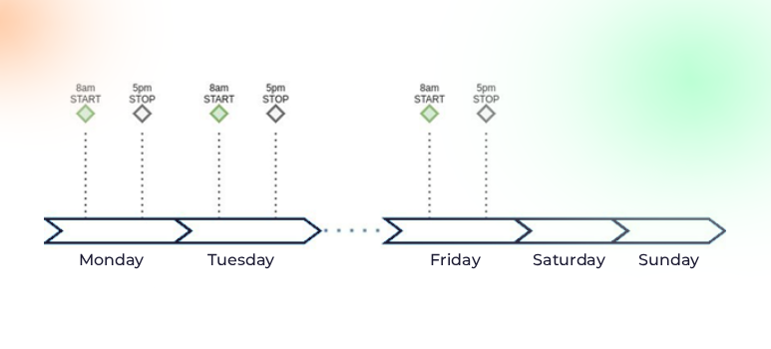
When doing so, it will stop all the virtual machines running in the cluster, including:
The cluster state will be saved in Azure, and then when you start back that AKS cluster, it will restore its state.
Overall, stopping and starting the cluster is an imperative measure ensuring Kubernetes viability, where you can easily achieve quick savings on many AKS clusters.
You can use either the Azure Portal or the Azure CLI commands (and even integrate it into a DevOps pipeline).
The example below demonstrates both start and stop AKS clusters with CLI commands:
The az aks stop command to stop:az aks stop --name myAKSCluster --resource-group myResourceGroup
To start a stopped AKS cluster, use the az aks start command:az aks start --name myAKSCluster --resource-group myResourceGroup
Learn more about how to start and stop your AKS clusters.
What if you don’t want to stop and start all the cluster's virtual machines (including the control plane)? Then you can stop just some virtual machines in specific user node pools.
This only applies to the user node pools, not the system node pools. System node pools should always be up and running within a cluster – unless you want to stop all the AKS cluster virtual machines.
To stop node pool-specific nodes or specific node pool virtual machines, use the command line:
az aks nodepool stop: az aks nodepool stop --resource-group myResourceGroup --cluster-name myAKSCluster --nodepool-name testnodepool
az aks nodepool start:az aks nodepool start --resource-group myResourceGroup --cluster-name myAKSCluster --nodepool-name testnodepool
Alternatively, you can use the Azure Portal: Go to the specific node pool, then click on the Stop button for that node pool.
In an AKS cluster, you can run one or more node pools. Each can be auto-scaled independently.
Independent autoscaling means: if your cluster doesn't need that many VMs, it will reduce the size of the node pool and remove some unneeded VMs.
Thus, it directly lowers the cost since you’re billed based on the number of VMs in each virtual machine scale set (VMSS) linked to the node pool.
Trying to answer “How much compute power does my production traffic exactly need?” is often extremely hard, especially upfront.
When creating an AKS cluster, the “not too much, not too little” approach is often used to determine the number of nodes to set.
While it might work early on, as traffic increases and apps need more CPU and memory, it won’t be efficient. Before long, you’re manually scaling nodes up and down to keep things going – something you’d rather avoid.
This is why you should auto-scale in AKS. To enable auto-scaling in AKS, two critical components play a key role:
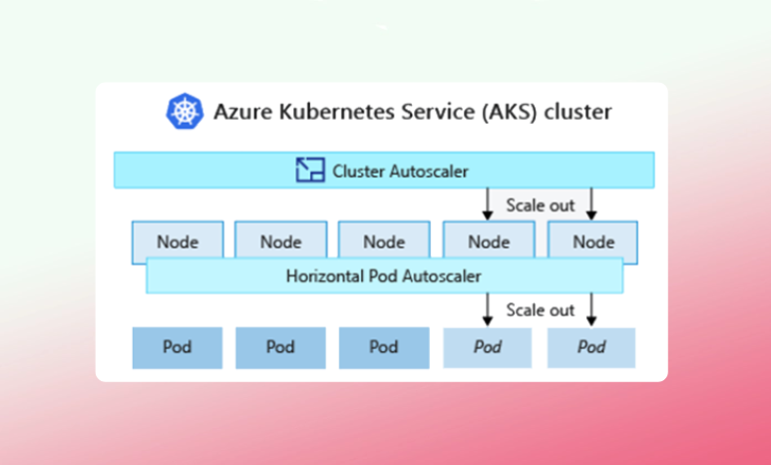
What the Horizontal Pod Autoscaler (HPA) does is address the number of replicas that your application needs. Put simply, HPA dynamically increases and decreases the number of pods based on resource demand.
When you configure HPA for a given deployment, you:
In detail, as load increases, what it starts doing is spinning up more pods (basically creating more replicas). Then, it places them on different nodes. But it doesn’t create any more nodes. The Pod Autoscaler simply creates more pods to address your application demand. But sooner or later, the nodes will run out of capacity. That’s where the cluster autoscaler comes into the picture.
When the horizontal pod autoscaler (HPA) tries to create more pod replicas but the current nodes can’t handle them, the cluster autoscaler steps in. It looks for unschedulable pods like “can’t schedule due to insufficient CPU or memory” and then automatically adds new nodes to the cluster to provide the needed capacity.
Once the new nodes are up, the Kubernetes scheduler assigns the pending pods to them. So, HPA and the cluster autoscaler work perfectly together. If the load is low, the cluster stays small. When a storm of traffic hits, HPA begins scaling up pods to handle it. If the existing nodes can't cope, the cluster autoscaler adds new ones. And when the storm passes, everything scales back down – so you're not left paying for unused capacity. Instead, you only provision and pay for the resources you need at any given moment.
Efficient resource allocation starts with properly setting CPU and memory requests and limits for your pods.
Can you pack in your pods as efficiently as possible to minimise resource waste with infrastructure you're already paying for? This is also known as “bin packing”.
If limits are set too low and actual usage is above the limit, your app may get throttled or run into out-of-memory issues. Getting this balance right helps the scheduler pack pods more efficiently, reduces unused capacity, and ultimately keeps your AKS costs lower.
Why set up up-to-date resource requests for the containers in your pods manually if you can let VPA do it for you? VPA automatically scales the pod to have more or less resources (the CPU and memory) by adjusting the pod’s requests and limits.
This keeps your workloads right-sized and efficient without you breaking a sweat.
VPA supports 4 modes:
You can also use the Horizontal Pod Scaler (HPA) and the Vertical Pod Scaler (VPA) together. However, there are a few things to keep in mind:
Alternatively, keep VPA in off mode to get recommendations, while HPA handles horizontal scaling based on CPU utilisation.
Apart from HPA and VPA there is another workload autoscaler in AKS called: KEDA – Kubernetes Event-Driven Autoscaling.
KEDA dynamically scales your application to meet demand in a sustainable and cost-efficient manner.

It can trigger scaling based on a wide range of events and data sources from Azure services, such as for example:
How it works:
KEDA allows scaling not just for Deployments, but also StatefulSets, Jobs or any custom resource you define. All in all, by leveraging KEDA, you can ensure your applications scale efficiently based on demand – leading to significant cost savings and optimised resource usage.
Provisioning new resources is pretty easy in Azure Kubernetes Services (AKS) – just as easy to oversee or forget them. Those idle resources (often hidden or forgotten) can add “quickly and quietly” to your Azure bill. Think about:
Often, organisations deal with orphaned instances – resources that “belong to everyone, but are owned by no one.” This issue is especially common in large organisations where multiple apps run at once and a centralised resource visibility is lacking.
It’s therefore crucial to:
Because in the end, what you don’t see will cost you.

We’ll review your Azure setup and identify the biggest cost leaks. You’ll receive a tailored optimisation plan with clear next steps and quick wins.
Request a cost assessment
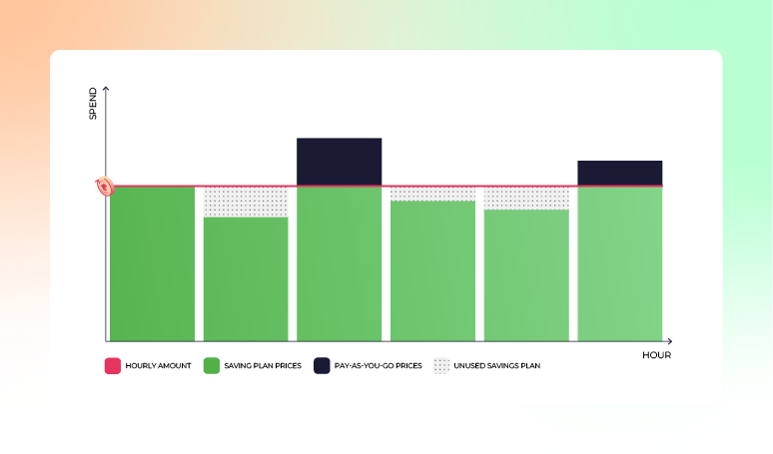
For consistent and predictable workloads, Azure Reservations can give you a reduction on the compute cost of up to 50–70% – if done correctly.
You should consider all the variables (match them to usage patterns) and not just follow Azure Advisor blindly.
If reservations don’t work for you, like when your workloads are not very consistent and predictable, you can also go with Azure Savings Plans. With Savings Plans, you commit to an hourly consumption of compute and pay for that, plus any usage above.
If you are unsure whether to go for Savings Plans or Reservations, read this article.
For non-critical workloads, Azure Spot VMs can save you significant computing costs, up to 90%. Spot instances are Azure’s excess compute capacity offered at a discount. Therefore, the actual prices depend on supply and demand, and range from very cheap to slightly cheaper than pay-as-you-go.
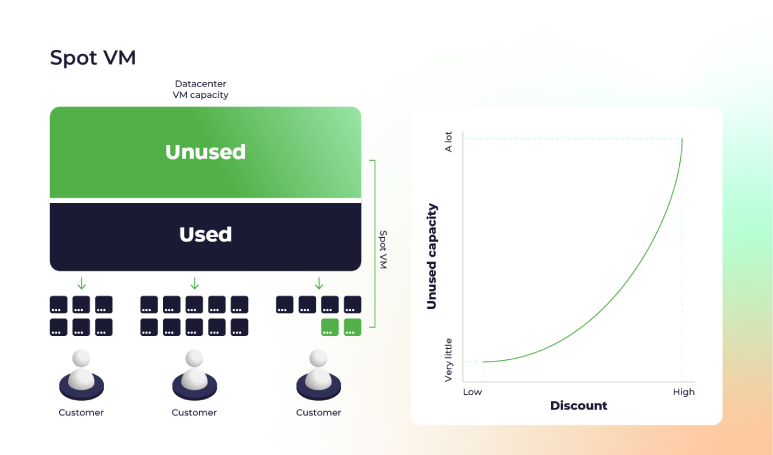
With Azure Spot Virtual Machines, you can:
However, this should only be used for Dev/Test or non-critical environments, not for production.
If you have Linux node pools, you can skip this saving method. It only applies to Windows-based node pools.
Part of the costs of your Windows-based node pools come from licensing the Windows OS, per vCPU – which means the larger the nodes, the higher the licensing fee.

If your organisation already has on-prem Windows licences, you can use Azure Hybrid Benefit (AHB), which lets you bring existing licences to Azure.
Another method to benefit from AKS is choosing either the Free or Standard control plane SKU. By default, an AKS cluster will be created with a free SKU for the control plane.
Worth noting that it means you don’t get an SLA. While this might be okay for dev and test clusters, it’s not for production clusters. For them, enable the Standard SKU for production environments.
We’ve discussed how you can use several optimisation techniques to reduce your AKS compute costs (like choosing the right VM sizes) and taking advantage of Microsoft's discount plans. We also showed how you can benefit from various autoscaling options in AKS (workload and infrastructure-wise).
To that end, the more you lean on autoscaling to rightsize, the more efficiently you can bin pack and drive cost savings.
Ultimately, your chosen methods will most likely depend on your application scenario and organisational needs.

Are you looking for ways to save on your Azure costs? Contact us and we will happily help you out.